Info note
Advanced use of the PD 3950 USB to P-NET Interface
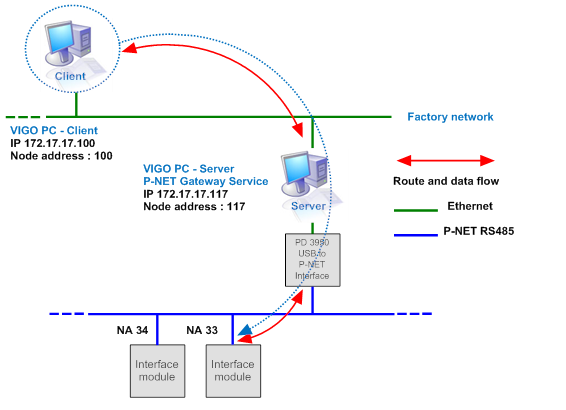
Gateway PC

Configuration of Gateway PC (Server)
New installation or replacement of PD 3930 PC P-NET Interface Module
– Install / upgrade to VIGO 5.9 or higher.
– By default is the P-NET Gateway Service configured to support a single PD 3950 USB to P-NET Interface Module.
Once installed, the service starts automatically when the computer starts and no extra configuration is required.
– The existing VIGO project can either be modified to adapt the use of the PD 3950 instead of the PD 3930 PC P-NET Interface Module.
But the easiest way to smoothly integrate an USB Interface with an existing project is to enable both projects in the relevant Workspace and make a few changes to the default USB project.
More information about PD 3950 installation and configuration is available by the use of this link. PD 3950 Installation and Configuration.
– The Node Address for the PD 3930 can be found in MIB at the MIB Properties for PNET3930LPT1 (This_PC or similar name) and Number of Masters is located at the MIB Properties for the NET related to PNET3930LPT1. E.g. LocalePNET
– Select in the MIB Properties the correct P-NET Node Address for the PD 3950, default Node Address 1.
– At the Workspace tab, select This_PC located in the USB project USB:This_PC.
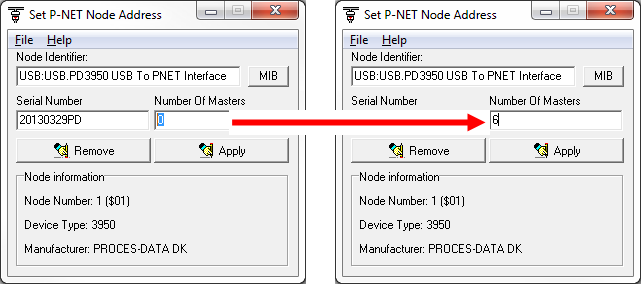
– Once the configuration has been adapted to the actual requirements, the PD 3950 must have set the Node Address and Number of Masters by the use of ‘Set P-NET Node Address’.
Key in the Serial Number and press Apply. Enter Number of Masters and press Apply ones again. If this is done successfully the VIGO is ready for P-NET communication.

– If this operation fails please check the LED Indicators and make sure that no personal Firewall is blocking port 34380 (P-NET Gateway Service). Use VIGO value or the Monitor to read USB:USB.PNET Gateway (Service).Service.FreeRunTimer. No Responce indicates that there is no access to the P-NET Gateway Service running locally within the PC.
In such case is it recommended that the Firewall is disabled temporarily and a new test performed.
– Start VIGO and use VIGO value or the Monitor to perform a communication test e.g. Service.FreerunTimer in one of the Interface Modules.
Configuration of Client PC
– It is also required that the configuration on the Client PC is adapted to match the new Server settings.
– Install VIGO 5.9 or higher.
– The easiest method to update the Client PC is Export the Workspace at the Server PC and Import the Workspace on the Client PC.
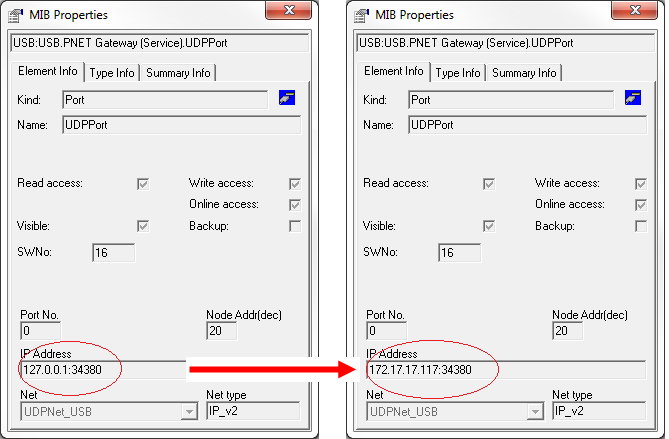
– Select MIB Edit and open the MIB properties for the UDP port in the P-NET Gateway Service. USB:USB.PNET Gateway (Service).UDPPort.
– Replace the default IP address 127.0.0.1:34380 (localhost) with the IP address of the Server PC e.g. 172.17.17.117:34380 according to the illustration above. The Node Address is maintained 20 (dec).
Default settings
USB:USB.PNET Gateway (Service)
Settings at Client PC
USB:USB.PNET Gateway (Service)

– At the Workspace tab, select ThisPC located in the USB project USB:This_PC.
– Use VIGO value or the Monitor to read USB:USB.PNET Gateway (Service).Service.FreeRunTimer. If this is a success go to next step.
If it fails, check that Server PC IP address is correct and port number 34380 is not missing in the VIGO configuration for the P-NET Gateway Service.
– Check the settings for the Firewall on the Server PC to ensure that port 34380 is open for UDP communication. Disable the Firewall temporally and try again.
– Use VIGO value or the Monitor to perform a communication test e.g. Service.FreerunTimer in one of the Interface Modules.
VIGO Licence
As with the PD 3930, the PD 3950 has a build-in licence for VIGO.
If you wish to use this licence, the PD 3950 must be selected as the licence source. PD 3950 Installation and Configuration.
A VIGO licence for the Client PC is required. This can either be as PC licence related to the specific PC or as an extra licence related to the PD 3950 Licence server.


